
Install, pin, and open EZ Voucher
- On your computer, open Google Chrome and visit the EZ Voucher Chrome Web Store listing.
- Click Add to Chrome, then Add extension when Chrome asks.
- Click Chrome’s Extensions button—the puzzle-piece icon beside the address bar. Click the pin beside EZ Voucher to keep its icon on the toolbar.
- Click the EZ Voucher icon to open the side panel. Your website stays open beside it.
Already installed, but not showing?
Open Chrome’s three-dot menu → Extensions → Manage extensions. Find EZ Voucher and turn its switch on. Then use the puzzle-piece menu to pin and open it.
If your office manages Chrome and blocks installation, ask your administrator to allow the extension. See Chrome’s extension instructions for more help.
Use desktop Chrome to run the extension. Opening this guide on your phone does not install or run EZ Voucher on the phone.
Sign in and verify the attorney
- In the side panel, choose Create New Account, or sign in if you already have one.
- For a One attorney account, choose Alabama OIDS under Start with. Enter the requested account information and the attorney’s OIDS code, then select Create Account. If Chrome asks to allow access to OIDS, select Allow. Confirm your email if prompted. If Multiple attorneys is available and you choose it, follow the prompts to add an attorney after creating the account.
- Sign in to the attorney’s OIDS account in Chrome. The official login page opens in a new tab. Keep the OIDS page active and use Verify or Verify Now when prompted.
- Confirm the panel shows the correct attorney and OIDS detected · attorney verified before processing a bill.
If Chrome asks for OIDS access when you sign in or use EZ Voucher, select Allow. If the OIDS status card shows Connect OIDS, select it, then choose Allow in Chrome’s prompt.
The OIDS session must match the attorney selected in EZ Voucher. An assistant uses their own EZ Voucher login and the appropriate authorized OIDS session for each attorney.
Open the correct OIDS Timesheet Menu
In OIDS, open My Cases and find the correct active case that is ready for a Fee Declaration.

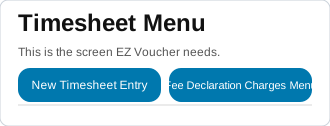
In 2. Review, EZ Voucher shows the entries and hours already on that timesheet. Check the case information before continuing.
Choose a bill, then load it
- Export the original bill from your billing software in a supported PDF, Excel, or CSV format. Use the original download/export rather than a scan or screenshot.
- Under 1. Import, select Choose a bill or drag it here, or drop your bill there. EZ Voucher detects the billing system automatically.
- For a previous interim bill, select Previous interim bill? and enter the date billed through before loading the file. Only entries after that date will be imported, so check for unbilled work on or before it. Use Clear to change the date after loading.
- Click Load Bill.
- Check the Billing system, Entries, and Hours against your bill.
Needs review tells you how many entries need attention. Click it or Review entries in the Submit section to resolve them. Clear removes the loaded bill from the workspace when you are ready to work with another file.
If an entry shows 0.00 hours, review it individually. Select Confirm — leave out only if it should be omitted from this import. If the time should be billed, cancel, correct the bill, and load it again. All zero-hour entries must be resolved before submitting.
No supported export? Use the EZ Voucher spreadsheet template. See the supported imports for available billing systems.
Tell EZ Voucher how the work should be entered
More about OIDS mapping and saved rules →
Open Review Entries and Mappings below the three numbered sections. You can review the bill before entering anything.
- Needs Attention: entries that need a decision or correction.
- Missing: entries not found in OIDS after using Check Entries.
- All Entries: the complete imported list for review.
When an entry needs mapping, choose its OIDS billing type and OIDS work type. Check From your bill and the OIDS preview, then click Save Mapping. Choose In Court, Out of Court, or Paralegal based on the actual work.
Saved mappings may also be used for matching activities. Review the preview before saving.
Mapping chooses where an activity belongs in OIDS. A new mapping rule also teaches EZ Voucher how to recognize your office’s wording and separate its activity from its description.
Open Saved Mappings to review, edit, or delete saved choices. Saved choices are reused for matching entries; still review each bill for accuracy.
Create a Mapping Rule
Create a rule to teach EZ Voucher your office’s billing phrases.
- With a bill loaded, click New Mapping Rule beside Saved Mappings in Review Entries and Mappings, or use New Mapping Rule while resolving an eligible entry.
- Pick an entry from your bill.
- Drag the divider between words, or click a gap. Put the activity on the left and its description on the right.
- Choose Enter as and the OIDS work type.
- When a description is required, choose Description only or Activity + description.
- Check the preview, then click Save Rule.
“Phone conference” will be mapped to TELECONFERENCE and keep the remaining words as the description.
OIDS result:
OC / TELECONFERENCE — with court staff
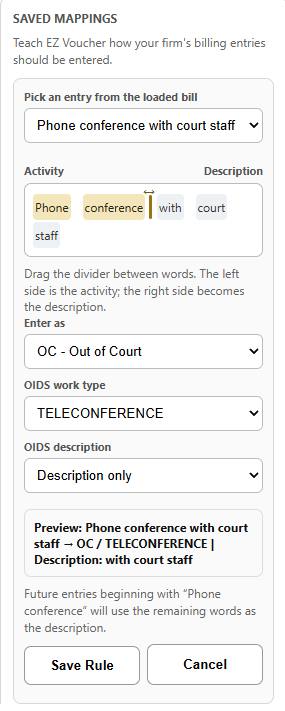
A later entry such as “Phone conference with client” can use the same rule and keep “with client” as its description. Choose Activity + description if you want the entire phrase retained instead.
Rules work across supported billing sources and are saved in this Chrome profile. You can edit or delete them in Saved Mappings.
Split an entry when it contains separate activities
If one source entry combines work that needs separate OIDS entries, use Split Entry during review. Give each piece the correct activity, description, hours, and OIDS selection.
The split hours must add up to the original entry’s hours. For example, a 0.5-hour entry could become 0.2 and 0.3 hours only if that reflects the actual time spent. Do not guess the allocation just to clear a warning.
If a suggested split is unnecessary, use Keep as One Entry when offered. If you save a reusable split rule, review its result on future bills too.
Check entries before starting
- Open the correct OIDS Timesheet Menu and load the bill.
- In 2. Review, click Check Entries.
- Review Timesheet entries and Timesheet hours, then check Bill entries in OIDS, Entries not in OIDS, and Hours not in OIDS. The timesheet totals cover the OIDS timesheet; the remaining counts and hours compare your loaded bill with OIDS. Investigate unexpected results before continuing.
- Compare the bill’s case or matter with the open OIDS case yourself. Resolve any mapping or source-total issue the panel identifies, then check again.
EZ Voucher compares the bill with the current timesheet to identify entries still needed. This is useful when resuming a partially entered bill.
Start entry, then review the finished voucher
- In 3. Submit, confirm Ready to enter and Ready hours.
- Click Submit. If an OIDS run is interrupted, use Start / Resume after checking the timesheet.
- Keep OIDS and EZ Voucher open. Stay with the same case and attorney while entry runs.
- If you need to interrupt the run, use STOP ENTRY. Review the current timesheet and use Check Entries before resuming.
- When entry finishes, review the OIDS entries, descriptions, hours, and amounts. Complete the final certification and submission yourself.
If Submit is unavailable, follow the message in the panel. You may need to load a bill, open the correct Timesheet Menu, check entries, or finish reviewing entries and mappings.
EZ Voucher does not certify or submit your final Fee Declaration. You remain responsible for the finished voucher.
Manage attorneys and subscriptions
Use the gear in the extension to open Account & Settings. You can also Manage Account on the web when you need account or billing access without opening the extension.
One login for multiple attorneys
If multiple-attorney management is enabled for your account, use Add Attorney to add another name and attorney code. Each attorney requires their own subscription. Use Select to choose who you are working for, then open that attorney’s authorized OIDS session and verify the matching code.
Finish or stop the current entry run before switching attorneys. Check the attorney code at the top of EZ Voucher against the OIDS attorney code each time. A subscription for one attorney does not activate another attorney.
Your trial and subscription
The free trial lets you use EZ Voucher to enter one bill. It lasts seven days or until EZ Voucher successfully enters and verifies the bill. You can choose a different bill while the trial is incomplete. If the trial expires before completion, open Account & Settings and select Restart free OIDS trial beneath the attorney cards when offered. You can still prepare and review bills after the trial; a subscription is needed to enter additional bills once the trial is completed.
Select Manage on the attorney’s card to open your account and manage subscriptions. Check which attorney’s subscription you are changing. After a billing change, return to the extension and reopen Account & Settings to refresh the account information.
A scheduled cancellation can remain active until its end date. Check the subscription details in your account if you want to change it.
Archive or restore an attorney
When this option is available, select Manage on the attorney’s card, then select Archive on the account page to remove the attorney from the active list while keeping their history. Archiving does not cancel a subscription. A renewing subscription must be addressed first; if cancellation is scheduled, review the end date before confirming the archive.
Open Archived attorneys to restore someone later. Restoring an attorney does not create another free trial.
A few quick checks
EZ Voucher cannot connect to OIDS
If the OIDS status card shows Connect OIDS, select it and choose Allow when Chrome asks. Then open the OIDS Timesheet Menu and select Check Entries. If the page still cannot connect, check Chrome’s site access settings for EZ Voucher and try again.
The attorney code is not verified
Compare the selected attorney in EZ Voucher with the attorney signed into OIDS. Open the matching OIDS session, then click that attorney’s Verify button. Choosing an attorney in EZ Voucher does not sign you into their OIDS account.
The bill did not load correctly
Confirm you clicked Load Bill after choosing the file. Try the original export from your billing system. If needed, select Bill didn’t load correctly? or Choose billing system, choose your system, and click Load Bill again. If entries or hours still do not match, stop and contact support with the system name and any error code.
The panel cannot find the timesheet
Return to the correct case’s Timesheet Menu, not the My Cases list or another claim screen. Select Refresh in the OIDS status card, then click Check Entries.
An earlier entry session is stuck
Use STOP ENTRY during a run. If a previous session prevents loading a bill, use Stop Previous Session when it appears, or Refresh in the OIDS status card. If an entry session is active, choose Stop and refresh to stop it or Cancel to keep it running. Open the correct Timesheet Menu and click Check Entries before resuming. Refreshing the browser page alone is not a stop command.
A button or feature shown here is missing
Confirm EZ Voucher is enabled in Chrome and that you are using the current Chrome Web Store release. Some controls appear only after loading a bill, selecting an attorney, or meeting the relevant verification or subscription requirement.
Need a hand?
Email support@ez-voucher.com with what you were trying to do and any error/report code. Never send passwords or payment-card details.
Visit Support